Showing posts with label Work With Her Hands. Show all posts

Wednesday, May 1, 2019

My Easter Dress and Thoughts on Hobbies

 Sew. Let's be honest for a minute. My generation is really awesome in that we're passionate about making a living doing things we love. If you've got to deal with the stress of work either way, why not make sure it's something you'll really love most of the time?

However, the downside to this is that it really drains the hobbies out of our lives. When everything that you enjoy has to make you money, you stop doing it simply for the enjoyment. Older generations understood that "work is work, and play is play"; "work hard, play hard"! But my generation, by trying to make our work always feel like play, have instead lost the true benefit of play. 

Sewing has been a hobby of mine for at least half my life now, but over the last year or so I was feeling burnt out. Not getting any enjoyment out of sewing, and wondering what was wrong with me. Truthfully, I blame it on three things. 

First, fit issues. I'm really particular about how my clothes fit and feel, and for a while I couldn't make anything fit properly; that combined with a body changing due to health issues had me really down-in-the-dumps about doing any personal sewing. 

Second, limited range of projects. The majority of what I was sewing was historical items. Yes, I adore historical costuming, but man, sometimes it's really refreshing to make whatever item you want out of whatever fabric you want, without having to worry that a dozen stitch-nazis will pounce on you if you do it wrong and don't have a dissertation's worth of primary sources to prove you right. 

Lastly, the fact that sewing is now my business. Don't get me wrong; I enjoy sewing for other people, and I am incredibly humbled and grateful that people are willing to purchase my imperfect creations and wear them in public. But sewing stopped being something I did simply for fun, and became entirely related to output. How much could I get done in how little time, while still making sure every detail was perfect so no customer was unhappy? Yikes. Talk about a kill-joy. 

All of a sudden, it clicked in March, while I was listening to a delightful and amazing podcast called Love To Sew. In the first two episodes I listened to, the interviewees talked about how they sew simply because they enjoy the process of sewing. Yes, it's nice to have a finished garment to wear, and yes, it's nice if it fits well and you love it. But in the end, did you enjoy making it? Did you enjoy the way the fabric felt, or the way the collar seemed to magically go together, or the nicely finished details you created? That is why we sew. 

Think of it like cooking. There are people who cook simply because they must eat; they are equally as satisfied by sticking frozen chicken-fingers in the oven as they are by following a recipe to cook from scratch. And then there are people who cook because they love the process. Frozen meals are so unsatisfying, because they want to see the colorful veggies on their cutting board as they dice them with a sharp knife, and hear the sizzling while sauteing, and wait patiently for the bread to get just the perfect brown on it. Of course it's great that they get to eat when they're done, but the cooking was equally as great. 

And that's what I realized: I don't want to sew just to create things. I want to sew because I enjoy the process of sewing. Since then, I have re-started sewing as a way to relax in the evening, embraced my love of hand sewing, and feel inspired to learn the nitty-gritty of garment fitting so that I can make things I really want to wear. I've been amazed at the ways that skills from historic sewing are just as helpful in modern sewing. And now I want to sew All. The. Things. 

All that rambling to say - my Easter dress! This is one of the first creations to come out of my sewing epiphany, and I truly love it. It started out as a wild 1970's outfit that was just a bit too much; the whole tunic and maxi skirt thing - I couldn't bring myself to wear it. But that fabric! Silky, and colorful, and oh so floral!


My original plan was to simply take in the tunic to fit me better, slightly alter the collar, and use the maxi skirt for something else entirely. But the more I thought about it, I realized that first, I didn't really like the shape of the tunic, and second, if I had a dress I was unlikely to ever make another garment out of the same fabric. So, if I had to take the tunic apart anyways to bring it in, why not really change it up? 

Skirt pleats.
 I started by taking off the collar, sleeves, and zipper. Then, I cut the dress in half at the waistline. I cut two new skirt panels from the maxi skirt, and sewed those in between the two original skirt panels, to end up with a fuller, four-panel skirt. Then, I pleated that new skirt back onto the bodice. I then drastically cut down the neck and re-inserted the zipper (which, holy cow, was actually fun to sew by hand). Last, I was going to entirely change the sleeve shape, but ended up simply shortening them a bit; I really loved that the bell shape helped the dress retain a bit of its 70's vibe. 

The lovely zipper placket.
I did all of this alteration by hand. It was so enjoyable to spend an evening or a weekend curled up under a fuzzy blanket, listening to podcasts, and feeling my needle slide through the silky fabric. 

One of the things I'm post proud of is that I took the time to finish all my inside seams. For most of the seams I folded the allowance in towards itself and whip-stitched the edges, but I also used a pretty green seam binding for the waistline and neckline. The inside of the dress is almost as pretty as the outside! 


These finishes mean so much to me because up until recently, I was too impatient to sew that way! I've always been a "good-enough" kind of person, and I'm certainly not a perfectionist now, but I've truly come to appreciate a well-made item that shows the maker spent a little extra time on it  to get it just right. I'm so proud of how far I've come in my sewing practice!


This dress definitely taught me that I still have a lot to learn. It fit a lot more comfortably before the sleeves were put back on, and why do I always get a weird little gap at the front of my dress whenever I do an open neckline? But, it's still a garment that fits well and that I love to wear, especially because wearing it reminds me of the joy of making it!


Sew. If you've made it all the way to here, thank you. I hope, if nothing else, this inspires you to go do something you love, simply for the enjoyment of doing it!


Friday, July 11, 2014

{Works With Her Hands} Period Correctness

Most of you know about Period Correctness, but if you've been following me on Facebook, you also know that I haven't been posting much. It would seem that I haven't had much business, but thankfully, it's quite the opposite! Period Correctness has been getting lots of orders this summer!

Last night I cut out pieces for mid 1800's civilian trousers, and a man's shirt. Plus, there are several other orders on the waiting list!


Make sure you check out the Facebook page, follow us, and share with your friends! There are some new and exciting plans in the works for Period Correctness, and you'll want to catch the latest news!

Tuesday, July 1, 2014

{Works With Her Hands} - 1830's/1840's Dress

Every spring and fall at Genesee Country Village, we put on special Hosmer's Inn Dinners. If you've never heard of them, or never gone to them, I would definitely recommend checking them out! Anyways, I usually get the play the hostess (A.K.A. Mrs. Hosmer), and this year I decided that I would like to make a dress of my own for this role.

However, there was the trouble of buying fabric again. Thankfully, I have awesome friends who also do historic sewing and who are always willing to pare down their fabric stash. I got the fabric for this dress from a friend in exchange for doing some sewing for her.

Both of my inspiration dresses are from the Victoria and Albert Museum. They are late 30's, early 40's. I wanted the bodice and upper sleeves of the first dress, but the lower sleeves of the second dress.


Thankfully, I had help from an expertise seamstress at the museum. She helped me drape the bodice, and pointed me in the direction of some great tutorials for the rest. Koshka The Cat was my main source of help. I used her 1840's Daydress as a guide for the sleeves, and the 1855 Ball Gown for the bertha. I sewed the bodice entirely by hand, which considering that every single stinkin' seamed is piped, was so easy feat! But, I got the dress done the morning of my first Hosmer's Diner, and it was a grand success!

I didn't get around to taking pictures of it that night, though, so here are some pictures from the Celtic Faire at the museum this past weekend.


Saturday, May 31, 2014

{Works With Her Hands} - HSF Challenge #10 - Art

For the next Historical Sew Fornightly challenge, I actually decided not to sew something, but to crochet something. The challenge theme this time was Art. My dreams were to replicate some beautiful gown from a favorite painting.These were some of my original inspiration:


But, practicality meant that I needed to scale down. I already had some other big projects in the works, and I couldn't spend the time or money on a fancy dress. However, I soon realized that there WAS one piece of art which I absolutely loved that would be easy to replicate:


This plate comes from the 1856 February edition of Godey's Lady's Book. Ever since I first saw the green and pink hair piece, I have wanted to re-create it, and this gave me the perfect excuse! Its description reads thus:

"By Happy Conception of the artist, we have at once the front and reverse of the single graceful figure in evening-dress. Hair in full bandeaux, fastened by a pearl comb, a cordon of the point passed across the brow, fastened by a single black rose and foliage. For a dinner dress, nothing could be more simple and elegant."

I realized after reading it that the coloring of the plate is not accurate to the description. However, I prefer the pink and green to the black, and I just so happened to have green yarn and pink flowers.

After much trial and error of various crochet lace patterns, I settled on Wheel Pattern Insertion from Knitting, Crochet, and Netting by Eleonore Riego De La Branchardiere, published in 1846. 

Here's my finished product....oh the joys of trying to take pictures of yourself :P The hair still needs a little practice, but I'm really quite pleased with how the hair piece turned out!


And the HSF details:

What the item is: Hair piece

The Challenge: #10 - Art

Fabric: sage green wool yarn

Pattern: Wheel Pattern Insertion

Year: Specifically 1856, generically 1850s and 60s

Notions: pink flowers

How historically accurate is it? I'd say pretty close....the only thing that might be different is that the yarn and flowers would be better as silk.

Hours to complete: Several hours of experimenting with different patterns, maybe 1 1/2 hours once I had decided.

First worn: for pictures

Total cost:$0!!!


Monday, May 12, 2014

{Works With Her Hands} - Black and White Challenge

The next challenge in the Historical Sew Fortnightly that I chose to do was Black and White. I had dreams of doing all sorts of really spectacular things with that color combination, but right now practically must take precedence over fancifulness.

What I was really in need of was a new chemise, so I decided to adapt it and still make it fun by adding some black embroidery. This was a neat project because I drafted the pattern myself from pictures of original 1850's and 60's chemises. It worked out really well, and only needed a little tweaking in the shape of the yoke.

The sleeves are just simple rectangles with small triangle gussets in the underarm seams. My biggest problem with my other chemises was that the sleeves were too full and too long, so I tried to rectify that with this one.


The front and back of the chemise are basically just rectangle, but the top front is cut into this funny shape in order to fit nicely into the shaped yoke.


The back of the yoke is just a gradually curved band, but the front pieces kind of remind me of a bat. :/ Thankfully, they look less bat-ish when finished!


Here's the finished chemise, complete with embroidery. There are five tiny buttons down the front of the yoke.


Over all, I'm super pleased, both with how it looks, and how it fits. Glad to now have my own, easy, nicely fitting chemise pattern!

Here are the details for HSF:

What the item is: Chemise

The Challenge: #9 - Black and White

Fabric: bleached cotton muslin

Pattern: my own, drafted from pictures of originals

Year: 1850's/60's

Notions: Black cotton embroidery thread, buttons

How historically accurate is it? I would say about 90%. I think the shape and fabric are good; the embroidery is inspired by original pictures, although I know that it was usually done in white.

Hours to complete: One hour for drafting the pattern, two hours for sewing, and four or five hours for embroidery.

First worn: Yesterday

Total cost: $4 for fabric, maybe?

Thursday, February 27, 2014

{Works With Her Hands} The Making Of A Kirtle

This year, I am participating in a sewing challenge, called Historical Sew Fornightly. The challenge I chose to do this month was called "Under It All". So, I decided to sew an early medieval kirtle, or under dress.

I decided to do this for two main reasons. #1 - These dresses are beautiful, and I've seen many wonderful examples from other people in the sewing group. #2 - I thought it would be a great chance to learn new techniques.

What made this dress so different from other dresses that I have made is that it is a bust-supporting garment; that is to say, you don't wear a corset underneath like I do with my 1800's dresses. Instead, it is the fit and shape of the dress itself that provides the support. The other big learning curve is that for the most part these dresses are draped instead of cut from a pattern. This means that I created my own pattern by laying scrap fabric on myself and pinning till it fit correctly.

This was the first time I tried to drape my own pattern, and it was quite the challenge! It probably took me four tries, but I finally managed to get this:


Next, I used those pattern pieces to cut out the dress. This was the scariest part of the whole thing! Usually I don't flinch about cutting into the real fabric, but this time I was terrified, since I really didn't know if it was all going to work.


One of the coolest parts for me was learning about how to draft the sleeve. I've always had issues with sleeves on dresses I sew. Either the sleeves lay perfectly but restrict all movement, or they allow for free movement but have lots of ugly wrinkles. I never understood what the problem was or how to fix it, but researching how to draft a sleeve pattern explained all that! Apparently it has to do with the ratio between the measurement of your bicep and your armscye. Either way, this is the silliest looking sleeve pattern I've seen....but it works!


The actual process of sewing all the pieces together was very easy. It consists of two front pieces, two back pieces, and four skirt gores. I flat-felled all the seams, and did some basic facings for the sleeve and neckline hems. The sleeves button part-way up. The style of button used then is a self-stuffed fabric button. I made 24 of these, sewed them all onto the dress, and then had to do all the button holes!


The front laces up, so I also had to sew all the eyelets.


And here, finally, is the finished kirtle!


I'm very happy with how it turned out, and I'm so glad that I chose to do this project, because I learned a lot. Next in the making is a cotte, or over-dress to go with this.

And, the info for HSF:

What the items is: Medieval kirtle

The Challenge: #4 - Under It All

Fabric: 70/30 Linen/cotton blend

Pattern: my own, drafted using tutorials on Cotte Le Simple

Year: 1300s (?)

Notions: Thread

How historically accurate is it? About as much as time, money, and practicality allow. Since I won't be using this much, cut some corners, like blended fabric and sewing machine.

Hours to complete: Maybe 30, spread out over several days.

First worn: For the pictures, and just for fun the rest of the day around the house!

Total cost: $25 for fabric and thread.

Monday, February 3, 2014

{Works With Her Hands} Let The Quilting Begin!

A few weeks ago, I finished piecing the Double Wedding Ring quilt top:


It's queen size, so there is no floor space in our apartment big enough to lay the entire thing out flat! Definitely the biggest quilt I've made yet.

Such a big quilt can be really expensive to get backing for, so I reverted to my new money-saving trick - a bed sheet from a thrift store! This past weekend I got a queen size sheet in just the color I wanted for $3.Can't get much better than that! It isn't cotton, which I'm sure any quilting die-hard would nag me about, but I'm not picky. It's soft and silky, and gives a unique look to the quilting and drape.

Today, I layered and basted the quilt, and now the first ring is quilted!


The deep red backing really highlights the white quilting; the pictures don't do the color justice, though. 


For the large squares between rings, I chose to do a fleur-de-lis motif. Ever since Stephen gave me a fleur-de-lis pendant back in 2010, that symbol has had special meaning.


And now, only 55 more rings to quilt!

Saturday, January 25, 2014

{Works With Her Hands} - New Etsy Shop

Many of you are already familiar with my historical sewing business, Period Correctness. Well, orders there are just starting to pick up, and I've decided to help grow my crafting endeavours by starting a more modern Etsy page as well. So, here is it!


https://www.etsy.com/shop/AllisCreativeLane


Please check it out, and spread the word to your friends! Also, if you see anything I have made on my blog and you would like to have one, too, don't hesitate to contact me about it! And, I've added links to both my shops on the upper right corner of my blog.

Thursday, January 16, 2014

{Works With Her Hands} Oh, Babies!

The past few months a lot of my projects have been baby items. Most of them were for my little nephew Hudson. I just finished working on this quilt for him. My mom did all the cross-stitched squares, and then I turned it into a quilt. I think it will look great with the rest of the travel-theme nursery!


Then, I've also been working on a present for a friend who is due in February. They aren't finding out the gender, so everything needed to be as neutral as possible. I ended up crocheting this adorable cat and dog duo:


Then, I knitted this onsie. The most interesting thing about it is the color patterns that ended up happening. I was working with two yarns, grey and white, at the same time. When I was knitting flat (the top and the bottom) the two colors looked more mixed. When I was knitting in the round, in the middle, the two colors are more scattered. I had no idea this would happen, but it looks kind of cool.


The edges are finished off with one row of grey crochet.


The openings have snap closures.


I'm really happy with how it turned out. It was stalled half-way, because I was using plastic needles, and one snapped :/  But, I got a nice new METAL pair, and from then on out it was an easy finish.

Wednesday, October 30, 2013

{Works With Her Hands} Dying Day

If you had come to me five or six years ago and asked what type of a crafter I was, I would have said a quilter, and a quilter only. Sure, I learned how to knit and crochet at a much younger age, but I thought quilting was my one-true-love in the craft world. Fast forward two or three years, and I would have broadened into being a seamstress, because I loved making quilts AND clothes. But ask me today, and I couldn't even being to give you an answer! I just love doing a little bit of everything, from paper to fabric to yarn, and everything in between.

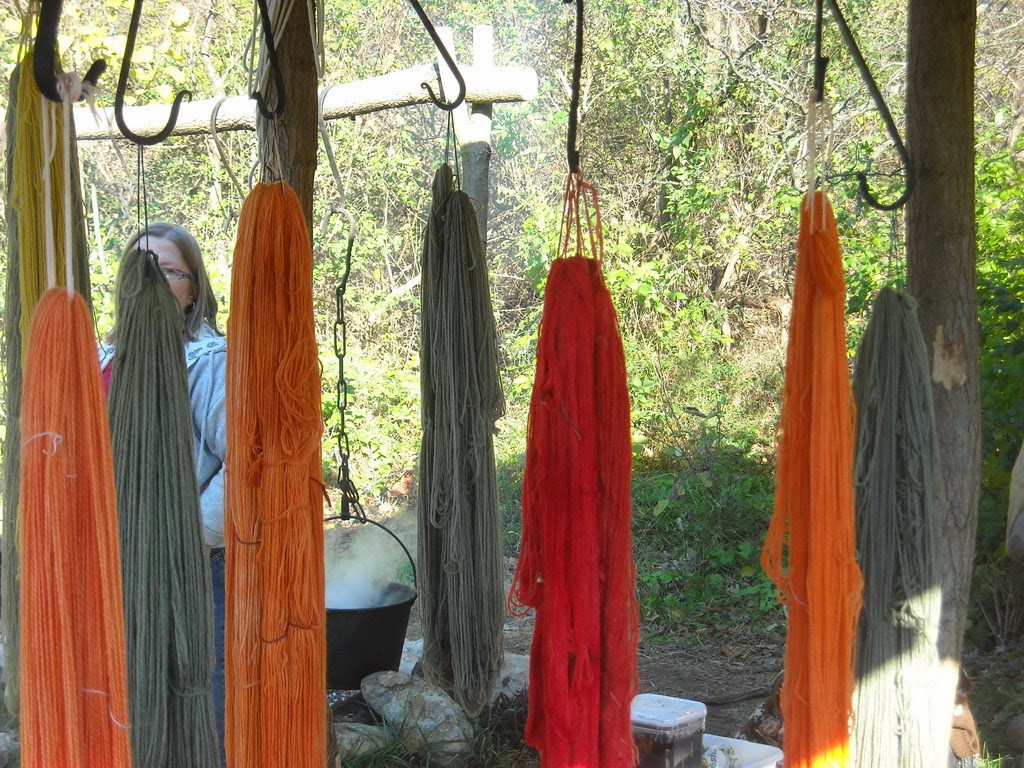
While I still love quilting, and must always have at least one quilt in the making, I've recently been discovering all the other awesome fiber arts; three weeks ago I learned how to spin on a drop spindle. Gosh, was that a tricky one to pick up! But, I did it....I'm getting a little better each and every time I try. Yesterday, a group of friends got together and we dyed wool yarn, the 19th century way with big kettles hanging over the fire and all-natural dyes. Now, I have some awesome plans for knitting up the yarns I dyed!

Getting things started by mordanting the yarn. Mordant, I learned is a pre-treatment for the yarn which will soak up the dye and make it colorfast. They seemed to be mostly metals....tin, chrome, alum, etc. 


Yarn soaking in sumac, to create a red-ish brown. This same yarn was then heated with water in an iron pot to become a charcoal grey. An yes, the pot or container that you dye things in makes a difference in color, too!


Getting the sage ready:


Because every party with *mostly* females needs a lot of this!


Right now it looks like some disgusting witch's brew, especially the sage:


Yay for frog hats! It was cold in the morning....


Checking out the walnut dye:


Our amazing picnic lunch of chili, cornbread, and baked potatoes. We sure know how to do these things right.


Most of us brought other fibery projects, too, like knitting and spinning.


All the pretty colors, fustic (yellow) on the right, madder on tin (orange) in the middle, and sage green on the left.


We had pretty colors all around us, too!


We also dyed with some indigo:


This yarn ended up variegated blue/green because of an interesting pre-treatment.....it was so beautiful!


And isn't this madder on tin amazing? Madder is a root, and can actually produce some very different colors depending on what mordant is used. Tin makes this fantastic orange. I was literally bouncing with happiness when my yarn came out this color!


Fustic, madder, and sage.


Marisa's yarn was partly acrylic, so it didn't hold the sage dye very well, which you can see in this picture. However, she then over-dyed it with indigo, and ended up with a beautiful light grey-blue.


Ron showing Sarah her fustic overdyed with indigo, watching it grow darker as it oxidized.


Such pretty colors! That green was produced by fustic and indigo.


Madder, sage, and cochineal (red):


Yeah, color makes me so ridiculously happy. It was so  fun experimenting, and learning how to produce such fabulous colors. The best part? They're all period correct for the 19th century. So when visitors harass me next year about how "They wouldn't have such a bright orange back then!", I'll be able to inform them that it really is accurate, and I even dyed it myself!